


Tutorial
How to add Facebook Pixel
on Canva Website
How to add Facebook Pixel
on Canva Website
Last updated on Apr 04, 2024 by Roberto Medeiros
How to Add Facebook Pixel to Canva (Easiest Way)

Looking for a tutorial on how to add a Facebook Pixel to Canva Site?
Utilizing a Meta pixel becomes essential when you're engaged in Meta (Facebook) advertising campaigns. By deploying a pixel, you gain the capability to monitor conversions, ensuring the effectiveness of your ads, while also tracking page views to facilitate the creation of retargeting ads and audience segmentation.
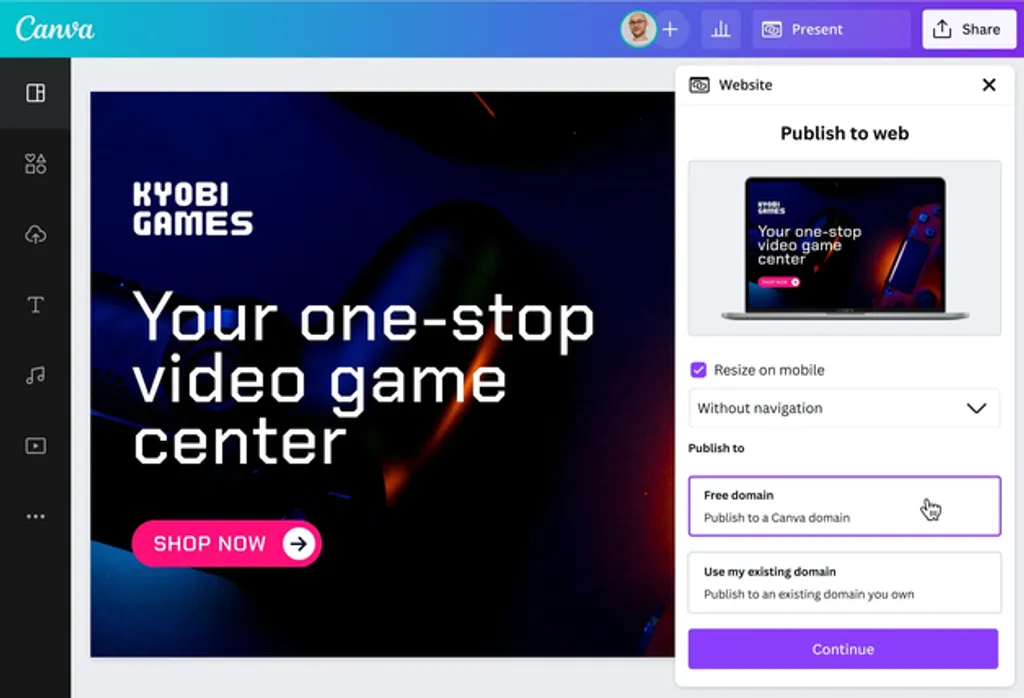
For users of Canva Sites, there exists a straightforward method to integrate your Meta Pixel and monitor ad conversions seamlessly. This article will outline the steps to achieve this.
To begin, let's delve into the definition and functionalities of a Facebook pixel.
What is a Meta (Facebook) Pixel?
The Meta (Facebook) pixel represents a small piece of code that you can incorporate into your website when conducting Facebook ad campaigns. Once implemented, this code enables Facebook to monitor and analyze the behavior of your website visitors, including their clicks and conversions.
This functionality empowers Facebook to furnish you with valuable insights regarding the performance of your ads, facilitating iterative improvements.
Moreover, the pixel facilitates the segmentation of your visitors into distinct audiences, enabling the deployment of retargeting ads tailored to specific groups.
In essence, it operates on a concept akin to Google Analytics.
Facebook Pixel & Events Setup & Installation (Step by Step)
How to Create a Meta (Facebook) Pixel
If you haven’t created a Facebook pixel yet, you can do it in just a couple of clicks!
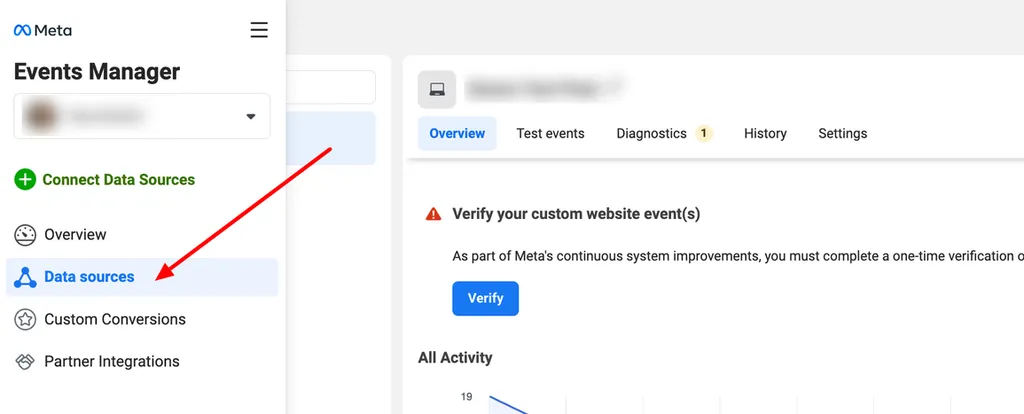
Step 1: In Events Manager, Connect Data Sources
To create a Facebook pixel, head to the Facebook Events Manager and, in the side navigation, choose Connect Data Sources:
Step 2: Create Your Pixel
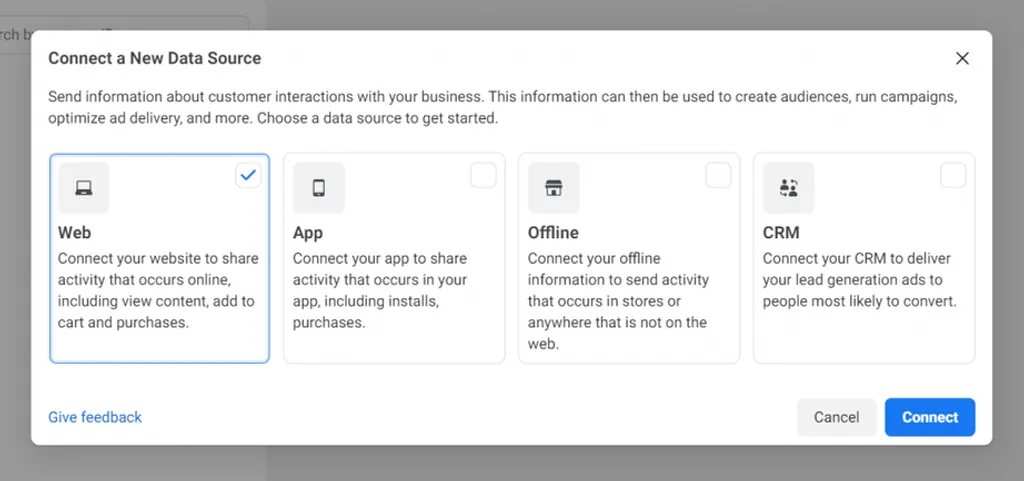
Now, go ahead and click Web, then the blue Connect button:
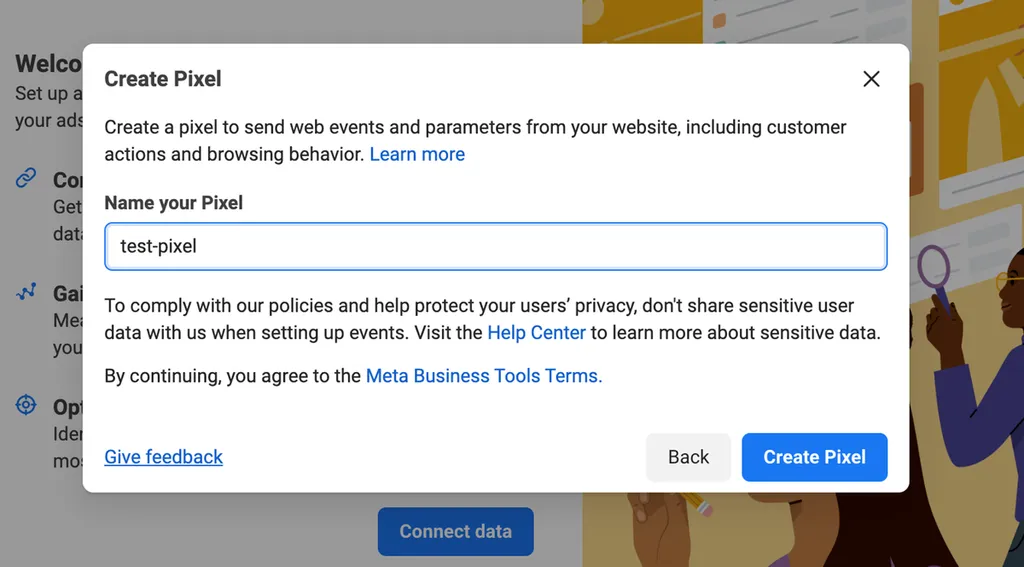
Then, name your pixel whatever you’d like and click the Create Pixel button:
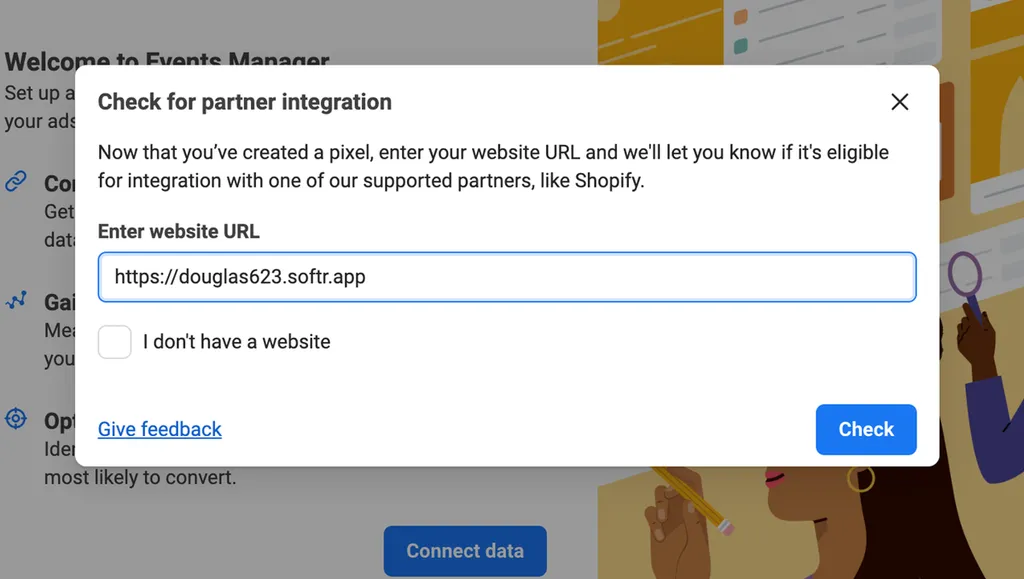
In the next step, you’ll be asked to input your website’s URL. Go ahead and do that and
click Check:
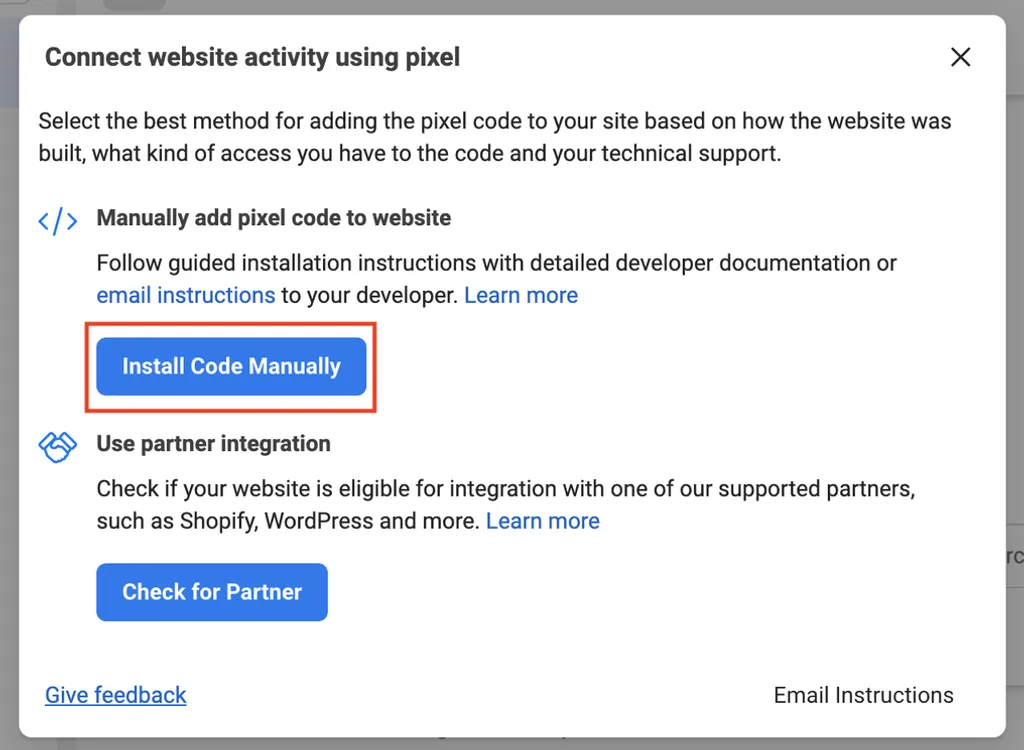
Step 3: Choose Install Options
Now, the tool will walk you through install options. We actually won’t need the code when installing with MonsterInsights, but we’ll go through this part anyway.
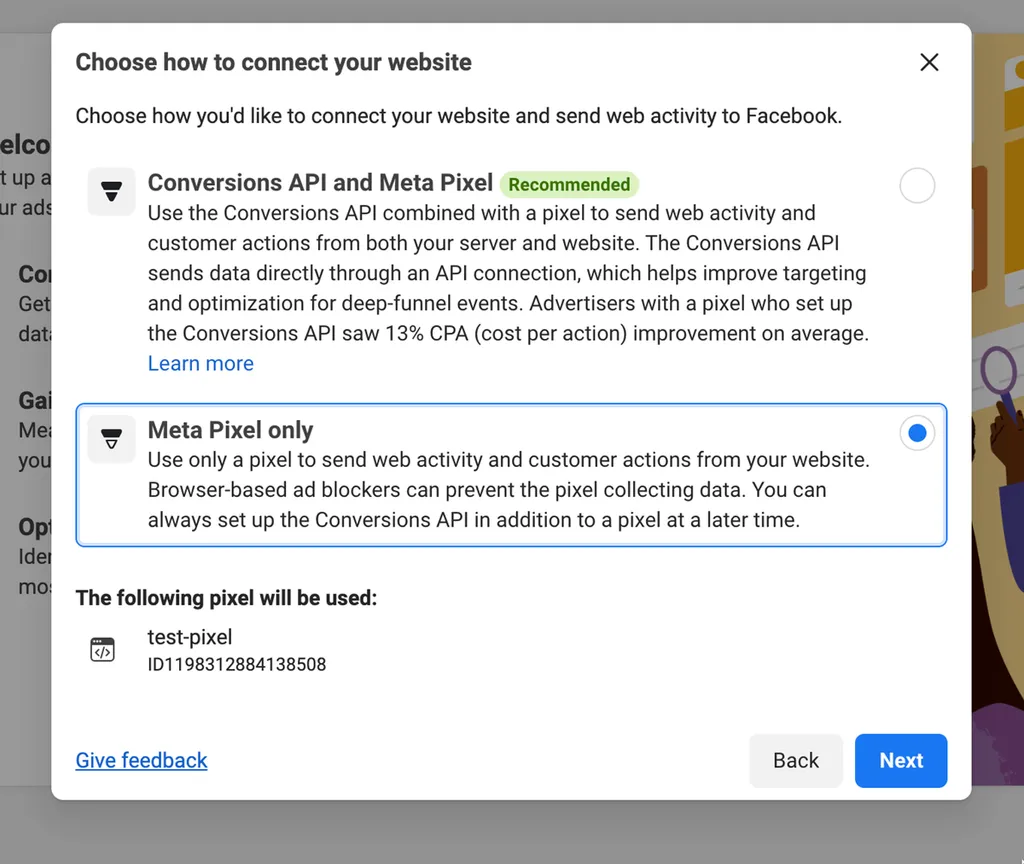
Choose Meta Pixel only, then click Next:
Finally, choose the Install code manually button. This will show you the base code that you’ll need to install if you choose, but when installing with MonsterInsights, we won’t need it.
That’s it, your pixel is created! Let’s install it on your website.
Add a Facebook Pixel to Canva Plugin: Easiest Way
The hands-down easiest way to add your Facebook pixel to Canva is with Canva Plugin.
How to Add Facebook Pixel to Canva (Easiest Way)
Last updated on Apr 04, 2024 by Roberto Medeiros
Looking for a tutorial on how to add a Facebook Pixel to Canva Site?
Utilizing a Meta pixel becomes essential when you're engaged in Meta (Facebook) advertising campaigns. By deploying a pixel, you gain the capability to monitor conversions, ensuring the effectiveness of your ads, while also tracking page views to facilitate the creation of retargeting ads and audience segmentation.
For users of Canva Sites, there exists a straightforward method to integrate your Meta Pixel and monitor ad conversions seamlessly. This article will outline the steps to achieve this.
To begin, let's delve into the definition and functionalities of a Facebook pixel.
Canva Plugin is the best Analystic plugin.
What is a Meta (Facebook) Pixel?
The Meta (Facebook) pixel represents a small piece of code that you can incorporate into your website when conducting Facebook ad campaigns. Once implemented, this code enables Facebook to monitor and analyze the behavior of your website visitors, including their clicks and conversions.
This functionality empowers Facebook to furnish you with valuable insights regarding the performance of your ads, facilitating iterative improvements.
Moreover, the pixel facilitates the segmentation of your visitors into distinct audiences, enabling the deployment of retargeting ads tailored to specific groups.
In essence, it operates on a concept akin to Google Analytics.
Facebook Pixel & Events Setup & Installation
(Step by Step)
How to Create a Meta (Facebook) Pixel
If you haven’t created a Facebook pixel yet, you can do it in just a couple of clicks!
Step 1: In Events Manager, Connect Data Sources
To create a Facebook pixel, head to the Facebook Events Manager and, in the side navigation, choose Connect Data Sources:
Step 2: Create
Your Pixel
Now, go ahead and click Web, then the blue Connect button:
Then, name your pixel whatever you’d like and click the Create Pixel button:
In the next step, you’ll be asked to input your website’s URL. Go ahead and do that and click Check:
Step 3: Choose Install Options
Now, the tool will walk you through install options. We actually won’t need the code when installing with MonsterInsights, but we’ll go through this part anyway.
Choose Meta Pixel only, then click Next:
Finally, choose the Install code manually button. This will show you the base code that you’ll need to install if you choose, but when installing with MonsterInsights, we won’t need it.
That’s it, your pixel is created! Let’s install it on your website.
Add a Facebook Pixel to Canva Plugin: Easiest Way
Now, go ahead and click Web, then the blue Connect button:
Introducing CanvaPlugin, a cutting-edge tool enabling you to fashion websites through Canva while housing them on Cloudflare. Elevate your Canva sites with professional features: Pixels, Tools, SEO enhancements, and unparalleled performance. Combine Canva's potent website capabilities with your personalized Cloudflare server to unlock the full array of professional tools.
Your website, perfected and powered by the best.


® 2024 - TappDigital
The products and services sold on this website do not represent any category of partnership or affiliation with Google, Meta, Canva, Cloudflare or any of their products and apps.
Introducing CanvaPlugin, a cutting-edge tool enabling you to fashion websites through Canva while housing them on Cloudflare. Elevate your Canva sites with professional features: Pixels, Tools, SEO enhancements, and unparalleled performance. Combine Canva's potent website capabilities with your personalized Cloudflare
server to unlock the full array of professional tools.
Your website, perfected and
powered by the best.
® 2024 - TappDigital
The products and services sold on this website do not represent any category of partnership or affiliation
with Google, Meta, Canva, Cloudflare or
any of their products and apps.